


Mastering Form Validation with Formik and Advanced Password Requirements
Building a Secure Password Form validation with ReactJs


In modern web development, form validation is an essential part of ensuring data integrity and security. When dealing with sensitive information, such as passwords, it becomes even more crucial to implement strong validation rules to protect user accounts from unauthorized access.
In this article, we will explore how to create a custom form validation with Formik in a React.js application, focusing on validating the fields of username email, password, and confirmPassword. Additionally, we will implement a password strength indicator that will visually demonstrate the strength of the password based on specific requirements.
Getting Started with Formik
Formik is a popular form library for React that simplifies the process of managing form states and handling form submissions. Before proceeding, make sure you have a React.js project set up and Formik installed.
If you haven't installed Formik yet, you can do so by running the following command:
npm install formik --save
Form Validation with Yup
To enforce the specified validation rules on the form fields, we'll use Yup, a powerful schema validation library. Yup allows us to create a validation schema for the form and then use it with Formik to validate the data entered by the user.
To install Yup, use the following command:
npm install yup --save
Implementing the Form
Create a simple registration form with the specified fields and validation requirements. We'll also add a password strength indicator at the bottom of the form to provide visual feedback on the required password strength.
Create a new component FormComponent and add the following code snippet.
import React from 'react';

const FormComponent = () => {
  return (
    <div>
      <h1>Custom Registration Form</h1>
    </div>
  );
};

export default FormComponent;
Import required dependencies inside the FormComponent
import React from 'react';
import { Formik, Form, Field, ErrorMessage } from 'formik';
import * as Yup from 'yup';

const FormComponent = () => {
  return (
    <div>
      <h1>Custom Registration Form</h1>
    </div>
  );
};

export default FormComponent;
Defining the Validation Schema
We'll define a Yup validation schema to enforce specific rules for each field. In the FormComponent.jsx file, add the following validation schema right below the import statements:
import React from 'react';
import { Formik, Form, Field, ErrorMessage } from 'formik';
import * as Yup from 'yup';

//validation schema
const validationSchema = Yup.object().shape({
 userName: Yup.string().required('userName is required'),
  email: Yup.string().email('Invalid email').required('Email is required'),
  password: Yup.string()
    .matches(
      /^(?=.*[a-z])(?=.*[A-Z])(?=.*\d)(?=.*[@$!%*?&])[A-Za-z\d@$!%*?&]{8,}$/,
      'Password must contain at least one uppercase, one lowercase, one special character, and one number with a minimum of eight characters'
    )
    .required('Password is required'),
  confirmPassword: Yup.string()
    .oneOf([Yup.ref('password'), null], 'Passwords must match')
    .required('Confirm Password is required'),
});

const FormComponent = () => {
  return (
    <div>
      <h1>Custom Registration Form</h1>
    </div>
  );
};

export default FormComponent;
After adding the validation schema, proceed by creating the form field with Formik. Replace the FormComponent with the code snippet below.
import React from 'react';
import { Formik, Form, Field, ErrorMessage } from 'formik';
import * as Yup from 'yup';

const validationSchema = Yup.object().shape({
 userName: Yup.string().required('userName is required'),
  email: Yup.string().email('Invalid email').required('Email is required'),
  password: Yup.string()
    .matches(
      /^(?=.*[a-z])(?=.*[A-Z])(?=.*\d)(?=.*[@$!%*?&])[A-Za-z\d@$!%*?&]{8,}$/,
      'Password must contain at least one uppercase, one lowercase, one special character, and one number with a minimum of eight characters'
    )
    .required('Password is required'),
  confirmPassword: Yup.string()
    .oneOf([Yup.ref('password'), null], 'Passwords must match')
    .required('Confirm Password is required'),
});

const FormComponent = () => {
  return (
    <div>
      <h1>Custom Registration Form</h1>
      <Formik
        initialValues={{
          userName:'',
          email: '',
          password: '',
          confirmPassword: '',
        }}
        validationSchema={validationSchema}
        onSubmit={(values) => {
          // Handle form submission here
          console.log(values);
        }}
      >
        {({ isSubmitting, values }) => (
          <Form>
            <div>
              <label htmlFor="userName">Username:</label>
              <Field type="text" name="userName" />
            </div>

            <div>
              <label htmlFor="email">Email:</label>
              <Field type="text" name="email" />
            </div>

            <div>
              <label htmlFor="password">Password:</label>
              <Field type="password" name="password" />
            </div>

            <div>
              <label htmlFor="confirmPassword">Confirm Password:</label>
              <Field type="password" name="confirmPassword" />
            </div>

            <div>
              <button type="submit" disabled={isSubmitting}>
                Submit
              </button>
            </div>
          </Form>
        )}
      </Formik>
    </div>
  );
};

export default FormComponent;
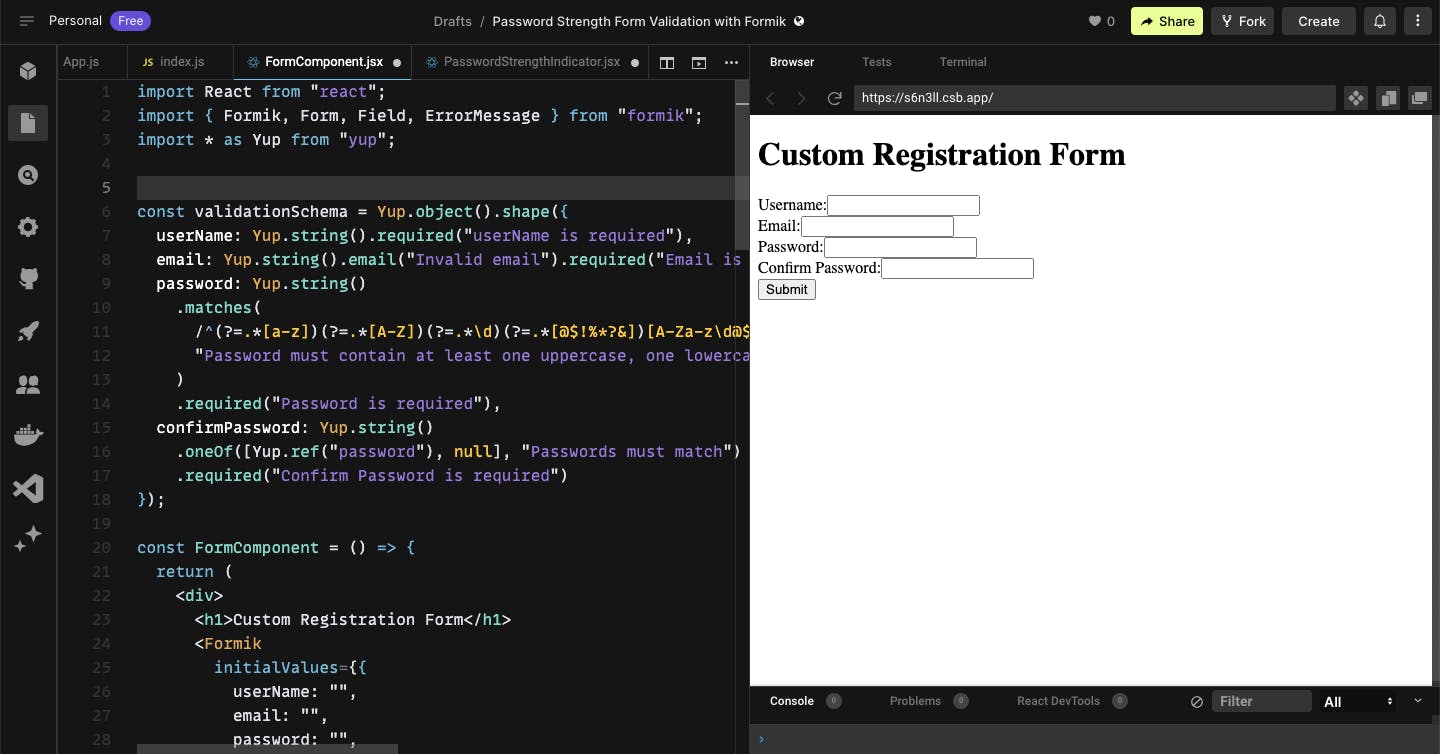
If you follow the steps correctly from the beginning, your output should look the same as the screenshot below.
Displaying Validation Errors
The <ErrorMessage> component from Formik is used to display validation error messages for each field. Include this component within each field's div to render the error message if validation fails.
import React from 'react';
import { Formik, Form, Field, ErrorMessage } from 'formik';
import * as Yup from 'yup';

const validationSchema = Yup.object().shape({
 userName: Yup.string().required('userName is required'),
  email: Yup.string().email('Invalid email').required('Email is required'),
  password: Yup.string()
    .matches(
      /^(?=.*[a-z])(?=.*[A-Z])(?=.*\d)(?=.*[@$!%*?&])[A-Za-z\d@$!%*?&]{8,}$/,
      'Password must contain at least one uppercase, one lowercase, one special character, and one number with a minimum of eight characters'
    )
    .required('Password is required'),
  confirmPassword: Yup.string()
    .oneOf([Yup.ref('password'), null], 'Passwords must match')
    .required('Confirm Password is required'),
});

const FormComponent = () => {
  return (
    <div>
      <h1>Custom Registration Form</h1>
      <Formik
        initialValues={{
          userName:'',
          email: '',
          password: '',
          confirmPassword: '',
        }}
        validationSchema={validationSchema}
        onSubmit={(values) => {
          // Handle form submission here
          console.log(values);
        }}
      >
        {({ isSubmitting, values }) => (
          <Form>
            <div>
              <label htmlFor="userName">Username:</label>
              <Field type="text" name="userName" />
              <ErrorMessage name="userName" component="div" />
            </div>

            <div>
              <label htmlFor="email">Email:</label>
              <Field type="text" name="email" />
              <ErrorMessage name="email" component="div" />
            </div>

            <div>
              <label htmlFor="password">Password:</label>
              <Field type="password" name="password" />
              <ErrorMessage name="password" component="div" />
            </div>

            <div>
              <label htmlFor="confirmPassword">Confirm Password:</label>
              <Field type="password" name="confirmPassword" />
              <ErrorMessage name="confirmPassword" component="div" />
            </div>

            <div>
              <button type="submit" disabled={isSubmitting}>
                Submit
              </button>
            </div>
          </Form>
        )}
      </Formik>
    </div>
  );
};

export default FormComponent;
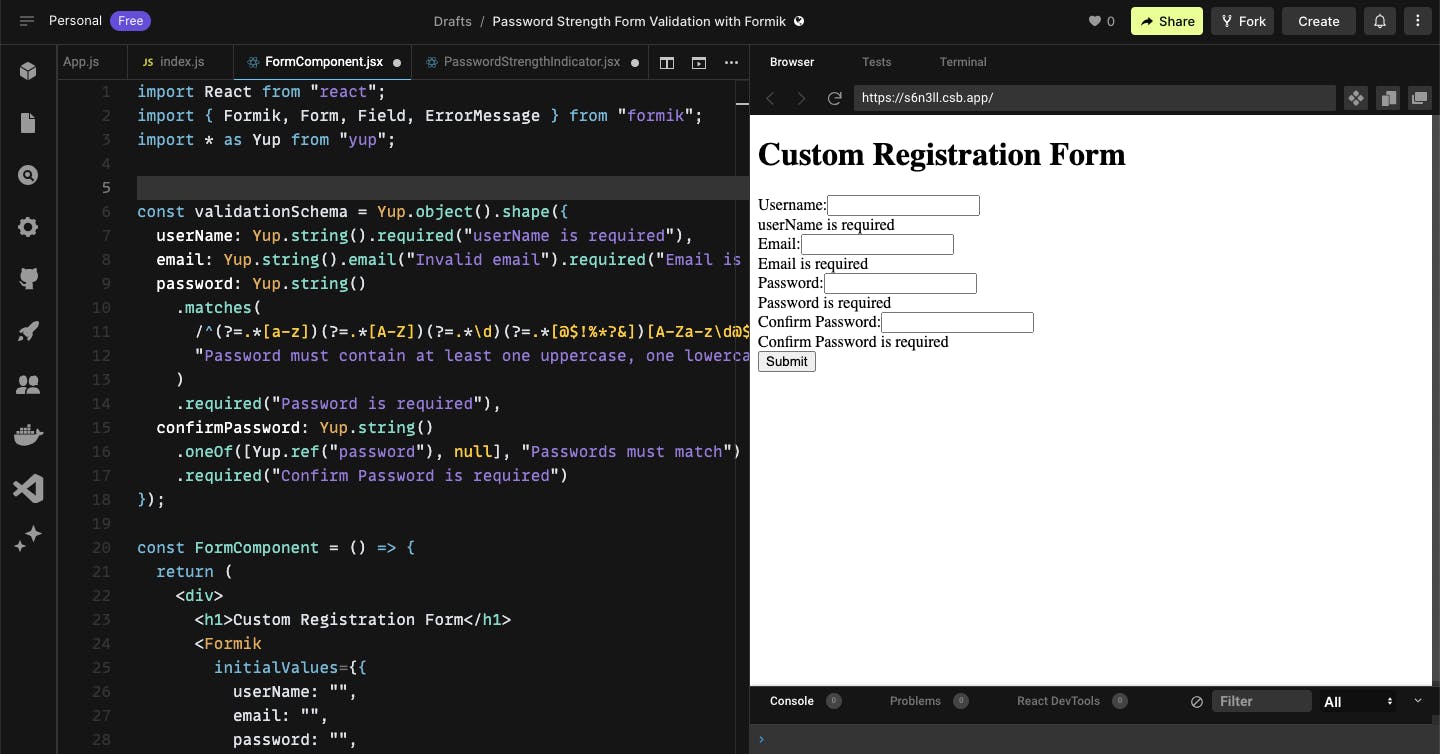
Your output should look the same as the screenshot below when you click on the submit button.
Adding Password Strength Indicator
To visually indicate the password strength based on the requirements, we will add a password strength indicator at the bottom of the form. We'll use the validation rules to determine if each requirement is met and display a green color if it passes.
Create a new component PasswordStrengthIndicator, copy and paste the code snippet below inside the component.
import React from 'react';


const PasswordStrengthIndicator = ({ password }) => {
  const requirements = [
    {
      label: 'Password Uppercase',
      condition: /[A-Z]/.test(password),
    },
    {
      label: 'Password Special Characters',
      condition: /[@$!%*?&]/.test(password),
    },
    {
      label: 'Password Lowercase',
      condition: /[a-z]/.test(password),
    },
    {
      label: 'Password is Eight in Length',
      condition: password.length >= 8,
    },
    {
      label: 'Password Has at Least One Number',
      condition: /\d/.test(password),
    },
  ];

  return (
    <div>
      {requirements.map((req, index) => (
        <div key={index} style={{ color: req.condition ? 'green' : 'red' }}>
          {req.label}
        </div>
      ))}
    </div>
  );
};

export default PasswordStrengthIndicator;
Integrating the Password Strength Indicator
Now, let's integrate the PasswordStrengthIndicator component into our FormComponent
Import PasswordStrengthIndicator inside the FormComponent
import React from 'react';
import { Formik, Form, Field, ErrorMessage } from 'formik';
import * as Yup from 'yup';
import PasswordStrengthIndicator from './PasswordStrengthIndicator'; // Import the PasswordStrengthIndicator component


const validationSchema = Yup.object().shape({
 userName: Yup.string().required('userName is required'),
  email: Yup.string().email('Invalid email').required('Email is required'),
  password: Yup.string()
    .matches(
      /^(?=.*[a-z])(?=.*[A-Z])(?=.*\d)(?=.*[@$!%*?&])[A-Za-z\d@$!%*?&]{8,}$/,
      'Password must contain at least one uppercase, one lowercase, one special character, and one number with a minimum of eight characters'
    )
    .required('Password is required'),
  confirmPassword: Yup.string()
    .oneOf([Yup.ref('password'), null], 'Passwords must match')
    .required('Confirm Password is required'),
});

const FormComponent = () => {
  return (
    <div>
      <h1>Custom Registration Form</h1>
      <Formik
        initialValues={{
          userName:'',
          email: '',
          password: '',
          confirmPassword: '',
        }}
        validationSchema={validationSchema}
        onSubmit={(values) => {
          // Handle form submission here
          console.log(values);
        }}
      >
        {({ isSubmitting, values }) => (
          <Form>
            <div>
              <label htmlFor="userName">Username:</label>
              <Field type="text" name="userName" />
              <ErrorMessage name="userName" component="div" />
            </div>

            <div>
              <label htmlFor="email">Email:</label>
              <Field type="text" name="email" />
              <ErrorMessage name="email" component="div" />
            </div>

            <div>
              <label htmlFor="password">Password:</label>
              <Field type="password" name="password" />
              <ErrorMessage name="password" component="div" />
            </div>

            <div className="error-box">
              <PasswordStrengthIndicator password={values.password} />
            </div>

            <div>
              <label htmlFor="confirmPassword">Confirm Password:</label>
              <Field type="password" name="confirmPassword" />
              <ErrorMessage name="confirmPassword" component="div" />
            </div>

            <div>
              <button type="submit" disabled={isSubmitting}>
                Submit
              </button>
            </div>
          </Form>
        )}
      </Formik>
    </div>
  );
};

export default FormComponent;
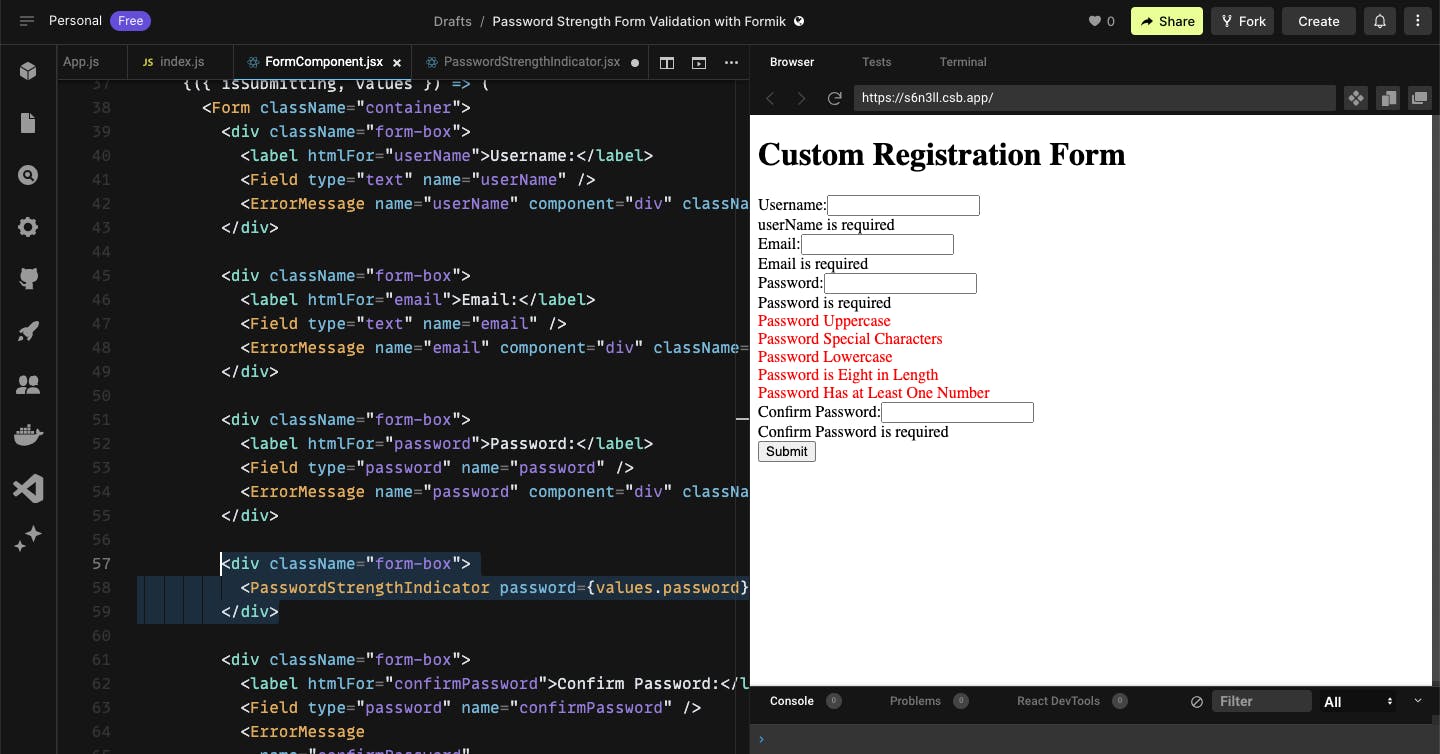
Your output should look the same as the screenshot below if you follow the steps correctly.
Adding Styling
Now let's add some styling to make our form look appealing, create a new style file style.css, copy and paste the code below inside the style file.
html {
  box-sizing: border-box;
}

*,
:before,
:after {
  box-sizing: inherit;
}

body {
  display: flex;
  align-items: center;
  justify-content: center;
  padding: 100px 0;
  margin: 0;
}

.container {
  padding: 30px 20px;
  width: 400px;
  border: 1px solid #999;
  border-radius: 5px;
}

h2 {
  text-align: center;
  margin-bottom: 40px;
}

.form-box {
  margin-bottom: 15px;
}

.form-box label {
  display: block;
  margin-bottom: 5px;
}

.form-box input {
  border: none;
  width: 100%;
  border-radius: 5px;
  height: 50px;
  outline: none;
  padding-left: 10px;
  border: 1px solid #999;
}

.form-box .error {
  font-size: 12px;
  margin-top: 4px;
  color: red;
}

button {
  width: 100%;
  background: #000;
  color: #fff;
  border-radius: 5px;
  border: none;
  outline: none;
  height: 50px;
  text-transform: uppercase;
  cursor: pointer;
}
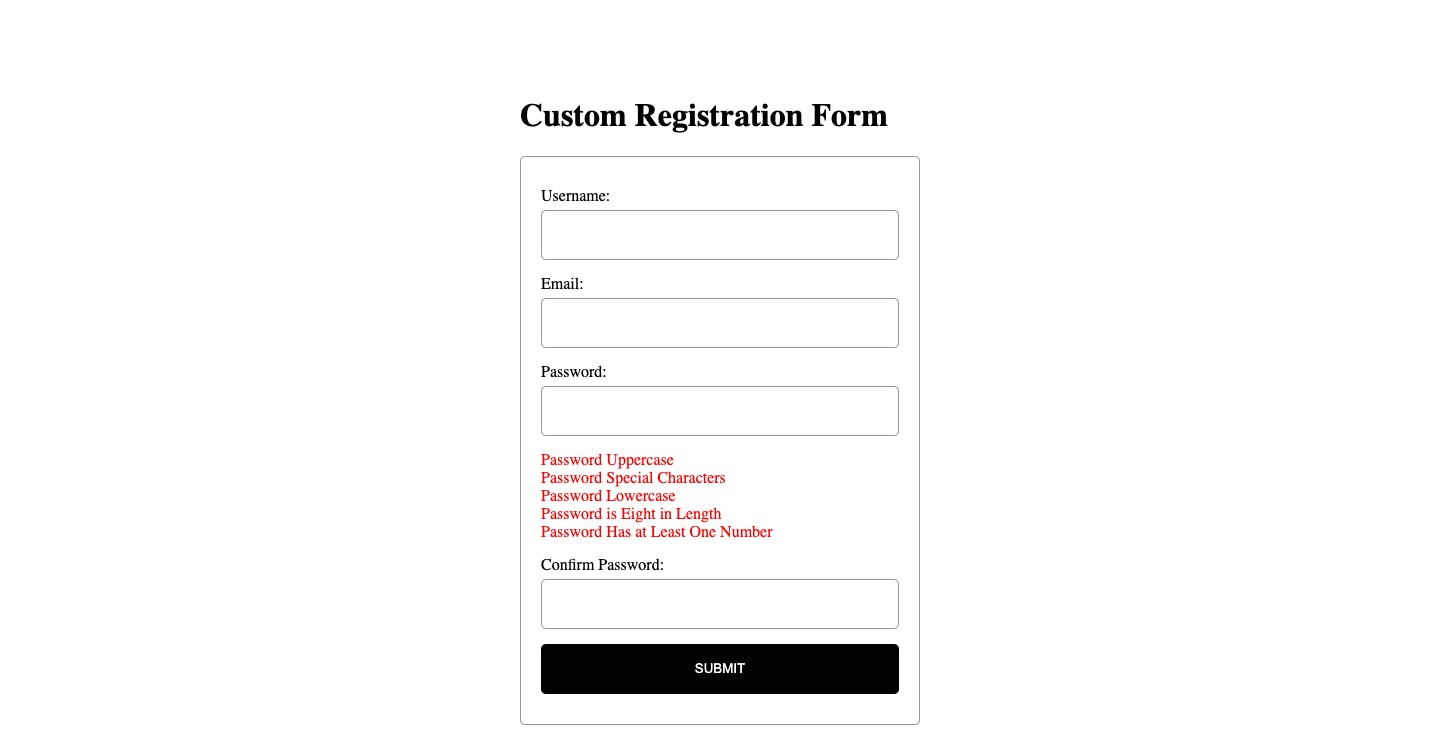
Your output should look the same as the screenshot below after styling.
Conclusion
In this article, we learned how to create form validation with advanced password requirements with Formik in a React.js application. We implemented strong validation rules for fields like userName, email, password, and confirmPassword. Additionally, we added a password strength indicator to visually show the user if their password meets the specified requirements.
Appreciation
Thank you for taking the time to read this article! I hope you found the information and examples provided valuable in your journey as a front-end developer.
Stay tuned for more informative articles, tutorials, and code examples. Together, let's explore the exciting world of front-end development and enhance our skills as we create exceptional user experiences.
Thank you once again, and happy coding!